weebly statistics
Home About Links Contacts Show Show
McKenna

Early Childhood Intervention – Everybody’s Doing It!

1070264_child_on_ranch.jpg Well, maybe not everybody, but more and more families today are learning all about Early Childhood Intervention!  I entered the world of developmental therapy as soon as my first child came home from the hospital because she had Down syndrome and was 100% tube fed.  In my circle of friends with children with Down syndrome, therapy has been part of our normal day-to-day routine since our children’s birth.  However, in my circle of friends who have healthy, typical children, developmental delays are far from uncommon and I have watched many friends of typical children enter the world of therapy I once thought was isolated to only children with “special needs.”  One of the biggest reasons for this is people are recognizing the advantages of treating developmental delays early.

While it’s not uncommon for a child in any sandbox across the United States to be receiving some form of early intervention, nobody wants their child to have a developmental delay in any area.  Watching your child achieve developmental milestones is probably one of the most rewarding things about parenting!  When your child isn’t doing something that most of his peers are doing, it can be incredibly discouraging. It’s important to remember that typically, a delay in developmental milestones DOES NOT mean your child is not going to catch up!  Most children who receive early intervention services catch up to their peers in their area of difficulty and no one knows the difference from that point on!

If your child does have a diagnosis that is going to stick with him or her long-term, you are far from the end of the world!  I have a child who will always be behind her peers in most areas of development, however we wouldn’t change anything about her.  In fact, she has brought so much joy and delight to our family, that we are adopting another child with Down syndrome .   It took some adjustments because of continuous therapy, but we very much have a life outside of developmental therapy!

So, what exactly is Early Intervention?

  • Early Intervention (sometimes called Early Childhood Intervention) was created by the United States Congress is 1986 to provide services for infants and toddlers under the age of 3 who have a developmental delay of any kind or a disability.

What services does Early Intervention provide?

  • Physical Therapy {PT} – for children with gross motor delays {late sitting, late crawlers, late walkers, etc…}
  • Occupation Therapy {OT} – for children with sensory issues, fine motor delays, feeding difficulty, cognitive delay, or a delay in social or emotional skills. {In very young infants, there is sometimes an overlap between OT and PT, so an Occupational Therapist may also treat some gross motor delays.}
  • Speech Therapy {ST} – for children who are late to speak or have feeding difficulties
  • Other services early intervention provides: Family education and counseling, Assistive technology devices and services, Audiology testing and services, Nursing services, Nutrition services, Psychological services, Service coordination, Social worker services, Vision evaluation and services, and some provide respite care for families!

What if my child is over 3 years old?

  • If your child is 3 years old or older, they do not qualify for your state’s early intervention program.  However, they do qualify for services through your public school system!  Contact your school district if you suspect a delay in any area of your child’s development after they turn three years old.

Getting started

  • If you think your child is taking a little too long in an area of their development, you can make either contact your child’s physician or you can contact your local early intervention provider.  You do not need your physician to refer your child for services.  You can find your local provider by going to your state’s website.  Here is Texas’ listing of early childhood intervention providers.  If you have trouble finding your early intervention provider, let me know and I will be happy to help!
  • After you or your physician calls to make a referral, your early intervention provider will schedule a visit to your home to evaluate your child and determine if they are eligible for services.  If your child is determined to have a delay, he or she will start receiving services shortly after the  evaluation.  That simple!
  • Remember that every child develops at a different rate and do not accomplish milestones at exactly the same rate.  If you have questions on whether your child is developing at an appropriate pace, contact your child’s pediatrician or your early intervention provider.

Here’s some more links for you!

Do you know anyone whose child is receiving services from Early Intervention?  Has your child received services from Early Intervention?  Do you have any other experience with Early Intervention? 

  • PS: In the spirit of National Adoption Month, I want to sneak this article in here (even though it has nothing to do with the topic at hand!) This article talks about the tax credit the IRS provides adopting families to help make adoption more affordable.  Most people don’t know that they can receive up to an $11,000 dollar for dollar reimbursement for their adoption expenses!!
Amanda

7 Simple Parent Hacks

by Amanda on November 9, 2008
category: 0 – 1 year (baby),1 – 3 year (toddler),Practical Tips

Parent Hacks is one of my favorite websites, because it gives you practical tips to make your life as a parent a little easier. Here are few parent hacks of my own that I have used. I would love to hear some the creative ideas that you have come up with in the comment section.

labelonphoto.JPG1. Using return address labels on the back of wallet sized photos. I honestly do not want to write Annabelle’s name, age, and date on the back of 30 photos. So I like to print out the information I want on a clear return address label and stick it to the back of the photo. You don’t get any pen imprints or bleed through from writing on the back. It also makes the photos look more professional.

2. Parking next to a cart return when you go shopping. This was a huge help when I had to lug my baby around in a car seat. When I leave the store I like to put my baby in the car first, but I don’t want to leave her alone in the car while I return the cart. Also, you don’t have to carry a car seat or a wiggly toddler very far to get a cart when you arrive.

3. Bringing your ipod and speakers to the park.
I like to take Annabelle to my neighborhood park, but it is usually empty and boring when I go by myself. So one time I brought my ipod and speakers with me. I could still keep my eyes on my daughter and I was able to listen to some good music at the same time. Annabelle would even dance to the music.

4. Giving your little one a snack at the grocery store.
Ideally I would love to grocery shop without Annabelle, but that doesn’t always happen. My problem is keeping her in the shopping cart seat. She likes to stand up. My friend Sarah said that she gave her kids a Dum Dum when she went and that help to occupy them. Annabelle was driving me nuts one day, so I went over the candy aisle and opened a bag of Dum Dums and I gave her one. It occupied her for a while and I was thankful. I saw one of my friends feeding her two little ones eggrolls from the Chinese take-out stand. I have since tried bananas, dried pineapple and opening a bag of bread, but I still keep a few Dum Dums in my bag for when I am desperate.

5. Using 2×4′s to install a pressure mount baby gate onto two banisters without drilling. My husband and I did not want to drill into the banisters at the bottom of our stairs to install a gate, so we used zip ties to attach a 2×4 piece of scrap wood to each of the banisters. After installing the wood, it was really easy to put the baby gate in place.

stairsandgate.JPG

Okay, these last two are for girls but maybe you could share them with a friend if you don’t have a girl.

6. Pairing dresses that are too short with a pair of pants. My daughter doesn’t grow out of clothes quickly, but sometimes dresses do get too short. I started pairing a dress with a pair of jeans underneath and I love it. I get more life out of her clothes and she looks cute.

aceindress.JPG


7. Put a rubberband around the bottom of a hair clip to keep it in their hair.
I can’t take full credit for this tip. I got it from the nice lady who runs a boutique here in my town. She told me to put a little rubberband on the bottom metal half of the bow to keep it from sliding in the hair. Every time I have done this it has worked.

rubberbandonbow.JPG

Do you have any parent hacks that you like to use? Do you have a solution for my problem of keeping my 18 month old safe in a shopping cart? (ha!)

Dawn

Half-Marathon: How I Prepared for 13.1 Miles

by Dawn on November 7, 2008
category: Health and Fitness,Husbands and Dads,Inspiration,Running

running-2.JPGTomorrow, I am hitting the pavement for a leisurely 13.1 mile run.  :)  Wow.  You can’t see me, but I am totally turning into the fetal position as I write this.  I am nervous!

We’ve talked before on The Mom Crowd about running races.  AmandaMcKenna, and I have all run 5Ks this year, and it was a great experience for each of us.  Over the summer, I realized that I prefer slower distance running over trying to beat my time in shorter races.  So when I read about a half-marathon that starts and runs through the area right around my neighborhood, I knew I had to give it a shot.

My first step was to look for a training schedule for beginners, to see if it was something I could feasibly accomplish.  I found this through my local Fleet Feet, and I was excited to learn that the largest sacrifice would be in carving out 2 hours or so each weekend to do the long run (and longer towards the end).  The weekly short runs were already the same amount of time I was taking during the week to run for exercise anyway.

Next, I needed to ask my husband for his support in this endeavor.  Since our children are so young, I knew I’d need him to watch the kids for many extra chunks of time.  I knew the training would also keep us from family time, somewhat, so I wanted to be sure that was okay with him.

After he gave me the thumbs-up (what a guy!), I thought about it for a few more weeks (I had room in our calendar to do this).  I didn’t just decide overnight that this was my goal; I spent lots of weeks stewing over it.  I liked running the other races I’d done earlier in the year.  Ultimately, I knew it was exactly what I needed to do for myself this fall.  We have a treadmill and lots of local greenways for running, so I knew I’d be able to incorporate the runs into our family’s schedule without too much stress.

I had good running shoes, the appropriate attire, a fantastic, ever-changing running playlist on my iPod, and the desire to make it happen.  There wasn’t much else to do but get going on the training.  At first, I decided to keep quiet about it, but after a couple of weeks, I knew I needed to share my goal with as many people as possible.  I created a special page on my personal blog to get the ball rolling and keep a little journal of my highs & lows.  I also kept a written log of each run on a clipboard.  In addition (because I am a list checker-offer), I made little signs of each week’s training so I could “X” them off after completion.  It’s these little things that served as fun rewards for me.

Throughout the past 3 months, I have experienced injuries and illness, though not related to my training.  I dealt with debilitating neck pain for about two weeks, which forced me out of running for awhile.  I read that it was best not to run while ill, but to get back in it when you’re ready.  So that’s what I did.  And my body quickly got back on track, even with a missed run here or there.

Once I hit the 10-mile mark, I got cocky.  I started thinking I was unstoppable, and lessened my commitment level.  I even tried to get away with skipping short runs in general and just running on Saturdays.  (You don’t need to tell me what an idiot I am – believe me, I figured it out just fine on my own! :) )

Despite all of my highs and lows, successes and mistakes, I think I am ready to take on the big 13.1 tomorrow.  There is more I could read online or in magazines to prepare, but I don’t want to psych myself out with too much info.  I know I’m a little out of my league, but that’s okay.  My goal is to make it across the finish line in 3 hours.

Last week, I asked my husband if I was a moron for thinking I could or should do this back in August.  He said I wasn’t.  He reminded me that this was the right choice for me because:

  • I wanted to do it.
  • it gave me tons of self-confidence.
  • it was good for me, physically, spiritually, and emotionally.

I share this with you because you might need a new outlet for stress or a new hobby.  Maybe you’re struggling with your weight and you need to feel like a rock star a few times a week.  That’s how I feel when I finish – most of the time, anyway.  Maybe you just want to have bragging rights – to say, “Yes, I ran a half-marathon.”  These are all the reasons I decided to give it a try.  Let me encourage you by saying, GO FOR IT.  You never know unless you try.  And to quote my friend Jan, who did this last year: “If I can do it, anyone can.”

I’ll be back next Friday with the full story.  Keep me in your thoughts & prayers this weekend!  Thanks!

Amelia

Finding The Right Co-Sleeper For You

by Amelia on November 6, 2008
category: 0 – 1 year (baby),Feeding,Pregnancy

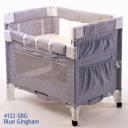
I had a friend recently email me asking what I thought about the different co-sleepers available and if I used one.  Then I thought it might make a good post!  Even if you are having your first, second, or third baby you might be on the hunt for a new or alternative sleeping arrangement rather than having the baby sleep in a different room from yourself.  Regardless of your parenting philosophy, many parents find that having baby nearby, sharing their bed, or right next to them is easier for night time feedings and those middle of the night diaper changes.Co-sleepers are similar to pack and plays in the way the look but they attach to the bed, giving the baby a special space of his/her own.  The co-sleeper is level with the bed which allows easy access for the mother or father to scoop up the baby when he/she is ready to eat, needs a diaper change, or just needs some attention.   mini-co-sleeper.jpg

The Arms Reach Co-Sleeper has become rather popular for moms who are planning on breastfeeding and want easy access to their babies at night.  I asked a friend who has the Mini Co Sleeper and she raved about it. Her husband is a heavy sleeper and she didn’t feel comfortable having the baby in bed with them while he tossed and turned at night.  She also knew that she would sleep more comfortably if she had the freedom to move and change positions without worrying about waking up the baby.  She mentioned that the co sleeper was also helpful right after the baby was born because she had a c-section and it allowed her to only have to sit up in bed to feed the baby rather than have to get up and go across the room or into another room to get her baby before feeding him.  She said it was very helpful for her recovery and healing process.  Not only that, but it also helps her get through the whole feeding, diaper changing ritual faster which results in her getting a little more sleep.  And every mom with a newborn is thankful for as much sleep as possible! The only drawback she said about the co-sleeper is that in order to get out of bed you have to either get out on the side the co-sleeper isn’t attached to or slide down past it and then get out of bed.  She likes the mini co-sleeper because it takes up less room and you don’t have to go as far down to slide out of bed.   The Arms Reach co-sleepers are portable and break down similarly to a pack and play which make them appealing for travel as well. And some take up less room when broken down.      snuggle-nest.jpg

Some parents like the feeling of closeness created by having the baby in bed with them. An alternative to bedside co-sleepers is something called a Snuggle Nest.  A Snuggle Nest creates a place for the baby in your bed and provides some boundaries so pillows or blankets don’t get too close to the baby’s face. I have another friend who used this with one of her babies and she loves it. She likes being able to hear the baby breathe at night.   She used it her second baby until he started rolling around a lot and getting out of his swaddle.  It became too hard for him to stay in the little nest. She is also using it for her third baby and still loves it.  At night when the baby wakes up to nurse she slides her down from the Snuggle Nest and nurses the baby and then slides her back up after she is done.  It makes it easy to doze while the baby is nursing and easier for her to go back to sleep since she didn’t have to get out of bed.  The other plus my friend mentioned to me is that since the baby is so close by she can listen for whether or not the baby is due for a diaper change.        

We have always had our babies in the room with us for the first several months–our first had the shortest stay in our room–only about 31/2 months.  He slept in a pack and play near our bed.  Our second and third slept in bed with us until they were 4 months old and then moved into a bed (still in our room) until they were close to a year old.  One was moved to a pack and play, the other to a crib.  I liked not having to get up and go to another room to get them for feedings and I liked that they were nearby in case I needed or wanted to check on them at night.  I had contemplated getting a co-sleeper with our thrid but decided to see if I still wanted on after he was born.  I thought about borrowing one from someone, but I didn’t know anyone at the time who had one laying around.  We just did what worked for us as a family. Although I enjoyed the babies sleeping with us or near us, I was ecstatic when I finally had my own space and room back. It was so nice to be able to read in bed and not worry about making any other noises that might wake up the baby–if you know what I mean :) .

Where did your baby sleep after he/she was born? What worked for your family? What didn’t work?

McKenna

What to Expect for Your Adoption Home Study

by McKenna on November 3, 2008
category: Adoption,Practical Tips

November Featured Families

November is National Adoption Awareness Month, so I thought I’d post about adoption this month.  One of the biggest pieces to our adoption journey, thus far, has been the home study process.  Before we started our adoption journey, I had no idea what the process was like.  I vaguely knew it was going to take a long time and I definitely knew it was going to cost a lot of money.  When we committed to adopting baby Reese, the first item on our to-do list was to have a home study completed by a licensed social worker.  I immediately started researching the process and became quite overwhelmed.  The lovely folks at Reece’s Rainbow walked me through the process and it ended up being much less stressful than I thought it would be.

I thought I’d share our experience with those of you who are beginning your own adoption journeys or those of you who are just curious as to how adoptions work.  Whether you are adopting domestically or internationally, you will have to have a home study done.  There may be some minor differences between domestic and international adoptio home studies and there is most certainly variances between social workers, but I believe that all home studies have the same foundation.

 Finding your social worker

  • This is the first step.  Finding a social worker who is experienced, licensed, and whose eager to help you in your adoption process can take some digging.  You can find many social workers at 1-800-homestudy or you can google or look in your phone book.  It’s important to find a social worker who is in your price range.  The fees for a home study can be anywhere between $600 and $2,500 for international adoptions.  Different countries have different requirements, so make sure your social worker has experience with home studies in YOUR child’s country.  If you don’t feel a personality connection with your social worker, find someone else.  This home study process can be anywhere from one month to several months long, so you want to be working with someone you like.  Ask what their turn around time is and what their process is like.  Every social worker runs their home studies a little differently, so shop around.  If the social worker doesn’t return calls, that may be a sign that they may not be easily reached when you need them.

Before your home visit

  • After you’ve selected your social worker, he or she will start you on a paper chase.  This will include locating your marriage license, birth certificates, divorce certificates (if applicable), filling out background check forms, having a medical exam, asking friends for letters of recommendations, having your fingerprints taken locally, and submitting financial records (note: you do not need to be rich to adopt, you only need to show that you are able to provide for your family).  Your social worker will also schedule a home visit to meet your family, see your home, and conduct interviews.  This may be scheduled before or after you obtain the necessary documents.

What to expect for your home visit

  • The home visit was the most intimidating part of this process.  We scheduled our home visit and it was canceled by the social worker last minute.  It was very frustrating because I had slaved over my house and it was sparkling.  It was rescheduled for the next week and again, I devoted myself to scrubbing and cleaning my house.  Our social worker arrived and was very friendly.  We gave her a tour of our home and she took a picture of each room.  She didn’t look in any closets (which I had spent hours cleaning) and didn’t even look at our master bathroom.  She looked at our backyard and didn’t look in the garage (whew!).  She said that she wasn’t there to inspect my cleaning abilities, but was there to make sure there was adequate space for our child and that our home was safe, which made me feel better, even though my house was the cleanest it’s ever been!  We then sat down to have an interview.  She asked my husband and myself individually about our motivation to adopt and about our childhoods.  Specifically, she asked about our parents’ discipline, activities we participated in, whether we had any history of abuse, etc…  She wanted to know what schools we’ve attended and what jobs we’ve had as adults as well.  She was pretty specific, but I did not feel like there was a “right” answer or a “wrong” answer.  She then asked us individually about our marriage and our parenting style.  She wanted to know if we would treat Reese like our other children and how we planned to incorporate Reese’s culture into our family.  After she conducted individual interviews, we were done.  Our kids are too young to be interviewed, however they were there the whole time, playing and fighting with each other.  We ate some pizza and salad, visited for a while and then she left.  She was at our house for about 2 1/2 hours.  I jokingly asked her if she was going to at least look at the fire escape path I made for her visit.  She laughed.  I had read that we had to have a fire escape path drawn out, so I did that and it wasn’t necessary in my case.  I know this sounds simple, but it really was this simple!

What happens next?

  • We are now in this stage of our home study process.  Our social worker left the home visit with the necessary documents and we received a draft of our home study about two weeks later.  I sent her some corrections I wanted her to make (minor things like misspellings and wording errors, etc…) and she made those revisions. We found out that our Child Protective Services clearance had not arrived, so we are now waiting for that.  Once that is received, she will UPS official, notarized copies of our final home study to both us and to our local USCIS (U.S. Citizenship and Immigration Services) office.  From there, we will hopefully receive an invitation from USCIS to have our federal fingerprints done and an approval from the US to adopt soon after that.

This is a very nutshelled version of our homestudy process, but it truly was this simple for us!  Something that was incredibly overwhelming to me has been smooth and simple, except for the minor delay with our CPS clearance form.

Here are a few resources for you as you begin your adoption home study process:

For those of you who have had a homestudy, what tips do you have for prospective adoptive parents?

« Previous PageNext Page »